ART BTEC Header

ART BTEC Header

Monday 25 November 2013

Illustrator Responses

OK, to ensure you are all crystal clear about what you should be doing over the next couple of days. What we want you to achieve is 4 beautiful responses to your 2 chosen illustrators using your own photos as the basis for these illustrations.
So you will need:
  • A collection of images by your 2 illustrators - enough to get a really good feel for their style, technique and media.
  • A range of photographs from the figure - try to get some good dynamic poses that have the feel of Fashion illustration/photography. If you are unsure what you are aiming for then flick through a few copies of Vogue and look at the fashion shoots and advertising images.
  • The appropriate media to respond to your illustrators, identify what they use and do likewise. If their work is produced digitally then don't try replicating it by hand.
Once you have all these things you need to really focus on making some impressive responses that capture the feel of each Artist. Use the lightbox to start your drawings from your own photos off if it helps. You might want to use software to extend and stretch the figures in your photos and achieve something closer to the classic fashion illustration proportions (which are quite different to the real proportions of the human body).

Here's an example of what I'm talking about:

Raw photo file

Digital Illustration by Jocelyn Gravot

Digitally developed response to Jocelyn Gravot

Thursday 21 November 2013

Fashion Illustration Research


Before tomorrow you need to look at the work of 2 fashion illustrators, here are a few good links to explore:
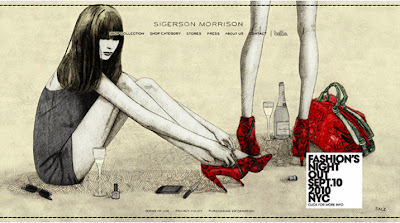


Anna Higgie
Try to choose illustrators that have contrasting approaches and use different media. For each selected illustrator print out 3/4 reproductions of their work at a reasonable size (A5ish).

You then need to provide some analysis of each illustrator. Find out what you can about them - where they trained, who they have worked for. Most importantly analyse the images you have chosen, identify what media have been used and discuss technique (expressive or controlled?), composition, use of colour. Give your personal opinion on the work, but ensure you give reasons for the views you express.

Present the work thoughtfully (2 A3 pages per illustrator), think about layout and text/titles etc.

 Tomorrow you will be doing some quick drawings of the figure and taking photos to develop your illustrator responses from. We will be needing people to pose for both drawings and photos, look at Fashion advertising/ location shoots to give you ideas about dynamic posture.

 From the photos you take you will be selecting 2 of the best and producing 4 of your own illustrations (2 in the style of each of your selected illustrators) from the poses found in your chosen photos.

 Following on from this we will be developing some original illustrations of our own next week and using these as a vehicle to develop and present your design proposals.

 TOMORROW:
BRING CAMERAS and DRAWING MATERIALS (pencils, erasers).

Tuesday 19 November 2013

Preparing for Presentations/Presentation Schedule

You have a busy couple of days ahead as we need to ensure all your presentations are given on Thursday so we can all move on to the Fashion Illustration work together from Friday.
Having just tried to start a Prezi with Freya it is clear that the Art department computers do not have the capacity to run the new version of the programme :-(
...for it to work properly the computers need to be running Google Chrome as their browser, and they don't have the capability.
So, Plan B: Powerpoint. Try to make your Powerpoints as creative as possible, whilst avoiding using templates/fonts that don't suit your creative subject matter. Using a blank presentation is a good bet. You will need to take a series of "zoomed in" photos of sections of each moodboard to properly explain your points.
These are the practical steps that need completing:
  • All 5 Moodboards finished.
  • Good photos taken of each Moodboard.
  • Photos tweaked (see post below) using PhotoShop so they look effective as Presentation slides.
  • Transfer your Moodboard photos (and zoom in details) to Powerpoint slides.
A suggested format for your presentation is
  1. Title slide "An object worth desiring" and your names.
  2. Your introductory Mood Board.
  3. 2 or 3 zoom in slides of key aspects of your first moodboard.
  4. Your second moodboard (research into your object).
  5. 2 or 3 zoom in slides of key aspects of your second moodboard.
  6. Your third moodboard (your garments).
  7. 2 or 3 zoom in slides of key aspects of your third moodboard.
  8. Your fourth moodboard (collections).
  9. 2 or 3 zoom in slides of key aspects of this moodboard.
  10. Your final moodboard (initial design ideas/material experiments)
  11. 2 or 3 zoom in slides of key aspects of your final moodboard.
  • Produce a set of 5 cue cards that bullet point vital information for each main slide - use these as a memory aid during your presentation, but be prepared to expand and ad lib rather than just reading off a card, as this tends to lead to dull delivery.
  • Work with your partner to practice the suitability of your timing and content - you should be aiming for a presentation time of 8 - 10 minutes.
See the exercise as an opportunity to "sell" your ideas and explain how your research has informed your initial garment ideas/object experiments.
Self promotion is an essential skill in many Art/Design careers, own the floor and start as you mean to go on!

Schedule for presentations on Thursday is as follows:

Time
Students
Object
11.30
Annie Adam, Freya Atkins, Katie Warren, Hannah (special guest)
Rubber Gloves
11.40
Flo Clarke, Amy Lucas
Plastic Cups
11.50
Georgia Masters/Jasmine Yarnell
Clothes Pegs
12.00
Georgia Plomer/Max Goodwyn
Plastic Bottles
12.10
Emma Momber, Emma Hope
Cutlery
TUTOR TIME & LUNCH BREAK
2.00
Katie Adlam/Kieran Harrington
Coat Hangers
2.10
Molly Christie/Katie Watson
CDs
2.20
Lucy Abraham/Jenny Brown
Envelopes
2.30
Holly Watson/Connor Whitney-Smith
Cardboard Tubes


Friday 15 November 2013

Preparing Photos of your Moodboards for Prezi

When you record your Mood boards for use in your presentation there are a few steps you can take to make sure that they look good.
The first of those are in taking the photographs - make sure they are well lit and that you position your camera above the centre of the image to avoid getting a taper distortion, take several photos to ensure you get images with a good sharp focus.
An example of "taper distortion"
 Once you have got decent photographs it is usually possible to enhance them in PhotoShop before you upload them to Prezi. Here is a raw photographic image followed by an edit of the same photo.


To achieve this I did the following:
  • Rotated the original image.
  • Cropped the image to remove unwanted areas.
  • Adjusted brightness and contrast to give the image more on-screen "zip".
  • Used the "sharpen more" filter to add crispness to the image.
  • Created a new layer, made a rectangular selection and filled this with a pale blue colour, then applied the multiply Layer style to this blue box.
  • Using the text tool added notes (in a font downloaded from www.dafont.com). I then used the move tool to place the text over the blue area.
  • Finally from the Layer Menu I added a drop shadow to my text from the Layer Style options.
HHaving done all this I then saved the final image as a jpeg (option available from the dropdown menu when you save in Photoshop). Using jpegs in Prezi works fine, if you upload .psd PhotoShop documents or high resolution digital photos you may find they slow your presentation down and stop it functioning properly.

Thursday 14 November 2013

Stuff that should be going into your Sketchbooks

Obviously the initial stages of this project involve lots of work outside the sketchbook, with your moodboards and Prezi being the main activities. You should record these in your sketchbook too. The first pages of your sketchbook should include the following:
  • Observational drawing/s from your object.
  • Photographs of your moodboard layouts (including alternate arrangements - take time to light these well, make sure you get sharp focus and consider tweaking in PhotoShop to ensure you do full justice to your work).
  • Screenshots of your Prezi slides.
  • 2 pages of research into the work of Martin Margiela - some of his Maison Martin Margiela collections were what originally inspired this project and he has explored using recycled materials in many of his garments. Your research should include brief biographical information about MM, find several examples of garments from his collections and analyse some in detail, discuss technical aspects of construction and the aesthetic impression the garment creates. Offer personal opinions on the work, but ensure that you justify them fully, explain how looking at MM might inspire or influence your own work/ideas in this project.
This Martin Margiela collection includes a long bomber jacket made from an old gown, a coat made from an windsurfing sail and a vest made from vintage baseball gloves.

Tuesday 12 November 2013

Moodboards for Prezi

Prezi/Moodboard Requirements
AN OBJECT WORTH DESIRING PREZI CHECKLIST
SLIDE 1 – Introduction – your object, your garment, yourselves.
SLIDE 2 – Initial findings – what your object is traditionally used for, how it has been used in a fashion context, if at all.
SLIDE 3 – Your garments – 3 examples of each from current collections – use sites such as style.com fort inspiration and an image of your own found ones – either being worn, on the hanger or on a mannequin, + A simple statement about where yours came from.
SLIDE 4 – An example of what a collection is - this can be a statement – almost a dictionary definition if you like, or a visual that you can talk about.
SLIDE 5 – Some ideas as to how you intend to progress from here, i.e. how you will manipulate, deconstruct or multiply your object – remember that this can be on a lateral as well as a literal level too……

Monday 11 November 2013

New Project - First Tasks

A few reminders, for tomorrow (Tuesday) you will need:
  • Money for an A3 sketchbook. Ringbound £7 (order online), or Stapled £2 (order online or pay cash).
  • Drawing materials (pencils, eraser, biro & fineliners if you have them).
  • A version (or multiples) of your object to work from. 
  • A camera/cameraphone.
Don't forget:
Before Wednesday you need to collect lots of material for moodboards, talk to your partner/s and decide what each of you will source. You will need things like:
  • Titles/Buzzwords (on acetate?)
  • Dictionary Definitions.
  • Photos from online sources of your object in standard use and also in fashion and other alternative applications.
  • Photos of yourselves.
For reference here is a list of what everyone drew from the "hat"
Student
Object
Garment
Freya
Rubber Gloves
Skirt
Annie
Rubber Gloves
Jacket
Georgia M
Clothes Pegs
Dress
Jasmine
Clothes Pegs
Skirt
Katie Warren
Rubber Gloves
Dress
Jenny
Envelopes
Hat
Lucy
Envelopes
Shoes
Georgia P
Plastic Bottles
Shoes
Max
Plastic Bottles
Hat
Flo
Plastic Cups
Bag
Amy
Plastic Cups
Shirt
Katie A
Coat Hangers
Dress
Kieran
Coat Hangers
Skirt
Molly
CDs
Jewellery
Katie Watson
CDs
Trousers
Emma M
Cutlery
Skirt
Emma H
Cutlery
Dress
Holly
Cardboard Tubes
Trousers
Connor
Cardboard Tubes
Jacket

New Project Brief - Recycled Fashion

BTEC NATIONAL DIPLOMA in DESIGN
 1st YEAR PROJECT BRIEF PROJECT– An object worth desiring…..
SPECIALISM: FASHION & TEXTILES
This project offers the opportunity to produce evidence towards the following units:
Unit 1: Visual Recording in Art and Design
Unit 2: Materials, Techniques and Processes in Art and Design Unit
3: Ideas and Concepts in Art and Design Unit
4: Visual Communication in Art and Design Unit
5: Contextual Influences in Art and Design Unit
07: Design Methods in Art and Design Unit
12: Computers in Art and Design Unit
30: Location Photography Unit
120: Fashion Media Techniques and Technology Unit
127: Fashion Visualisation Unit
130: Fashion Presentation Techniques
TIME: 6 Weeks
MATERIALS: Mixed Media
RESOURCES: Sewing Machine, Computer, Camera, drawing media, Photocopier, basic hand tools, 3D workshop and an object……

ASSIGNMENT OUTLINE: The idea of make do and mend is becoming more and more prevalent in modern day society, despite being born from war torn times when people really had to make the best of what they already had as little else was available to them, the concept couldn’t be more valuable today with depleting natural resources, and the constant anxiety of inadvertently increasing the size of our individual carbon footprints. What we are now seeing on both the high street and the catwalk firmly acknowledges that this is a very real problem and one which needs to be addressed and appreciated. The race is on, fifty years ago the earth was populated by half the number of people it is now, by 2050 this number is likely to be increased further, possibly up to 10 billion, and by all estimates there simply won’t be enough resources to go round. Deforestation, depleting food sources and a rampant consumerism are all taking their toll, and did you know that last year alone 1 in 50 people lost their homes due to either, war, natural disaster or foreclosure – this is a scary statistic and none of us are immune to this. It is believed that in the U.K. each year, we throw away an average of two million tonnes of fast fashion clothing that was probably only worn for around six times a piece. Fashion could probably be described as one of man’s biggest failures in the safe guarding of our planet with corporate groups encouraging dream lifestyles of selfishness, apathy, superficiality and greed. Something has to give and something has to change…. Few things touch as many people as fashion; therefore the continuation of what is beginning to emerge through sustainable clothing rests firmly on your shoulders. Using just a single object which may be commonly found in the home and an existing item of clothing, you are being asked to create a hybrid piece which uses the idea of recycled fashion. Furthermore you will be working alongside other individuals in BOTH of the BTEC groups to develop the idea of a collection.

GUIDELINES

1. The initial stages of this project should be spent on some thorough investigations. First of all you will be allocated your initial departure points for the project. As this is a random selection, your object, garment and fellow collaborators are all purely down to chance, so this could see you working alongside someone you currently know very little about. It is vital however, that you do work closely with your collaborators throughout the duration of the project in order to achieve a believable result, and by not doing so, you risk failing the overall project. This entire week is concerned with gathering material – this should consist of sourcing various examples of your individual objects, and finding out how these may have already been used in fashion. Make a range of careful studies of these objects, both as photographs and illustrations. As a matter of course you should be thinking all the time about how you will combine them with your item of clothing to create something new and exciting, it will be up to you how flamboyant or understated your ideas/designs are, but you should bear in mind that you are actually going to have to realise one of them! With regards to your allocated garment, you should again be finding as many examples of this as possible and looking for ways that you will be able to adapt your own. Where your garment comes from is entirely up to you, but it must be something which has previously been worn. What you collect/produce is going to be presented as both moodboards and a “prezi” (www.prezi.com) next week, so at this stage it is advisable not to stick anything into your books…Week 1

2. Once you have looked at your objects and garments in detail you will be required to present your findings visually, as previously mentioned. It is not always appropriate to hand over a sketchbook to a group when expressing your ideas purely because it is difficult for lots of people to be able to see the work at the same time, so in order to get your ideas across to the rest of the group effectively, you are going to work on a much grander scale! Following the guidelines given you will create a series of moodboards which will explain your ideas and concepts so far. A moodboard is an important tool in the design industry and will often be created at the beginning of a project as a means to maintain a constant flow of ideas, yours will be instrumental in helping you to get the most out of this project and will be photographed as you go along, so make sure that you have a camera at the ready – NO EXCUSES. These images will then be used to create your Prezi, this slideshow will be your first collaborative piece and will require good communication and a well organised plan of action as you will both be working on the same presentation. You will need to follow the checklist provided in order to ensure that you have provided all the necessary information…. The beginning of this week will also see you undertake some sustained investigations into what a collection actually is. Use www.style.com, www.elle.com, http://fashionarchitect.blogspot.com/, http://www.fashionisspinach.com/ http://thesartorialist.blogspot.com/ , look specifically at individuals like Hussein Chalayan the late Alexander McQueen, John Galliano, Gareth Pugh and Commes des Garcons, for the more alternative in ideas! Sustainable fashion heroes are Gary Harvey, Martin Margiela, Junky Styling, Ciel, and From Somewhere, and this one is just interesting if you want to get a bit more into the magazine side of things – good for layout etc….. http://magculture.com/blog/ . The library also has some amazing books – check out Maison Martin Margiela, Skin and Bones, A century of fashion, Techno textiles volumes 1 & 2, Extreme Beauty: The Body Transformed, Fashion at the edge, Fashion: Concept to catwalk, to name but a few! Week 2

3. Select two different fashion illustrators’ work and document it in your sketchbook, providing analysis on both their work and how you think their style of illustration might be appropriate to your own designs. You should endeavour to produce a design idea of your own in each style too. Following on from this you should now begin to produce further design ideas and start to physically gather more of the same object, and manipulate them, seeing what works and what doesn’t in order to apply it successfully to your garment. Remember to collaborate with your partner throughout –design ideas must actually look like they have come from the same collection! You will possibly need to compromise on things so prepare to be open minded….. There will also be workshops to help you with your figure drawing. Look at www.art-dept.com and other websites/books for fashion illustration inspiration. Week 3

4. How you go about using your object is up to you – we are looking for clever, inventive, original, technical and carefully engineered results – remember – we are not making costumes for the school play, this is a serious exercise, and the results will be going into your folios, so make the most of it. You will all be showing your work on the catwalk after Christmas too, there will be an audience and photographers to record your work. Think about weaving, stretching, melting, burning, adhering, scoring, rolling, wrapping, dissecting, reproducing, representing and smashing as considerations for getting the most out of not only your object, but your imagination too. Update your Prezi. Weeks 3 & 4

5. Following your investigations, trials and experiments you should now have a definitive design – it is now time to make it. Photograph every stage as you go so that you can illustrate the making process fully in your sketchbook. Take a series of well styled photos of the final outcome – Do not just stand in the studio or corridor to do this, find an appropriate space, even if it means you have to put yourself out doing so, I cannot emphasise enough how even the best design can be completely ruined by a lack of attention to detail in its final documentation…… Use www.art-dept.com to help you in this too – someone like Rankin is really worth looking at, as is showstudio.com & Tim Walker. You could also check out James Carver on www.flickr.com – he is an ex-student, currently studying at London College of Fashion. Week 5 - 6

6. Write a 500-1000 word evaluation of the project – guidance notes will be given. Week 6

MINIMUM SUBMISSION REQUIREMENTS:
• 1 COMPLETED SKETCHBOOK. • A SERIES OF MOODBOARDS – PHOTOGRAPHS AS EVIDENCE • 1 COMPLETED PREZI – EACH PARTY SHOULD HAVE IT DOCUMENTED IN THEIR SKETCHBOOKS + PREZI ACCOUNT DETAILS. • RELEVANT FASHION ILLUSTRATIONS. • FINAL GARMENT AND PHOTOS • WRITTEN EVALUATION REFERENCES: Use the internet. Use the library. Use your imaginations!