ART BTEC Header

ART BTEC Header

Friday 29 November 2019

FASHION PROPOSALS AND MAKING

You need to finish your designs for your garment so that you can move onto the  construction as soon as possible next week. You should finish the tasks outlined below before next Friday (6th December) at the very latest (earlier if possible)  This will mean you can then have  2 weeks (you break up on Thursday 19th) to make your piece. 

When you have concluded your illustration and design work this week then start to make as soon as possible  (especially important for ambitious or complex garments).

You will need to make multiple shapes and group these across the mannequin to be sure the visual effect is both showing off the manipulation of your ordinary object as well as reflecting something contemporary about couture fashion. 

We will arrange a studio photo shoot opportunity in the first week back after Christmas and we will be asking you to complete location shoots over the Festive break. Some fashion photographer research will support this phase of the project.
  • 4 pages of research into 2 Fashion illustrators, include a range of their work and your analysis of their technique.
  • A range of your photographs of the figure in "fashion" poses, printed out and included in your sketchbook.
  • 4 illustrator responses developed from your own photos (2 in the style of each illustrator you researched).
  • 2 pages of quickly sketched design proposals for your garment/accessory, you could use a template for these. Annotate alongside to explain your ideas and techniques you intend to use. These ideas can be variations on a theme, each one does not need to be radically different.  These should not take long. 
  • At least 1-2 pages of rigorous experimentation with your materials so that you know exactly how you will construct with this. 
  • 3 final proposals that show feasible designs showing:

    • Samples of your materials 
    • Annotations of how you will put these together
    • Additional materials, fabrics etc 
    • Please indicate which is your final design (the one you intend to make) - you might choose to do this in the style of one of the illustrators you researched or develop a more independent illustrative approach of your own.  

Quick drawings using templates or freehand 


 Final proposal showing samples, annotation etc. 


    You also need to think ahead and gather everything you need for your making:

    Things you might require include:

    Garments to reconstruct/embellish, Cotton thread, zips, velcro, fabric, dyes, iron-on transfer paper, multiples of your object (clothes pegs, rubber bands etc- make sure you have enough of these, you don't want to run out !!!!.). 

    Tools you may need to make your garment - scissors, tape measure, pliers, stapler, needle, cotton- (You will need to purchase this or bring your own in) sewing machine etc  We have most of these materials here. 

    Manniquin to work on- please try to find one around the department or arrange to bring yours in if you have one.  It is not necessary to buy one. 

    Order online (eBay www.ebay.co.uk/ is your friend here) or find other ways of obtaining your resources - suppliers such as Fabricland in Basingstoke www.fabricland.co.uk/fabric-stores/fabric-land-basingstoke may prove valuable. Charity shops are a good source for garments.


    Friday 22 November 2019

    FASHION ILLUSTRATION

    You need to research the work of 2 fashion illustrators, here are a few good links to explore: 


    Anna Higgie
    Try to choose illustrators that have contrasting approaches and use different media, as you are going to have to respond visually to these illustrators BE REALISTIC and select styles you are confident you can reproduce effectively.
    For each selected illustrator print out at least 4 reproductions of their work at a reasonable size (A5 ish).

    You then need to  do the following:

    • provide some analysis of each illustrator. Find out what you can about them - where they trained, who they have worked for. 
    • Analyse the images you have chosen, identify what media have been used and discuss technique (expressive or controlled?), composition, use of colour. 
    • Give your personal opinion on the work, but ensure you give reasons for the views you express.
    •  Use the following words  to help you describe their work:
    realism, colour, expressive qualities, character, exaggeration, structure, story telling, naive qualities, accuracy, decoration, delicate, applique, motif, inventive, inspiration, experimental, body proportions, pattern, accentuating colour, photographic, movement, embellishment, combinations, texture, movement, bold, etc etc 

    Present the work thoughtfully (2, A3 pages per illustrator), think about layout and text/titles  with intelligent analysis etc.

    So you will need:
    • To do the Fashion Illustrator research as detailed above.
    • To get a collection of images by your 2 illustrators - enough to get a really good feel for their style, technique and media.
    • To take range of photographs from the figure - try to get some good dynamic poses that have the feel of Fashion illustration/photography.   If you are unsure what you are aiming for then flick through a few copies of Vogue and look at the fashion shoots and advertising images.
    • Using your own photos as a basis produce two Fashion illustrations in the style of each Fashion Illustrator you have researched (4 images in all), make sure you use the most appropriate media (identify what they use and do likewise, if their work is produced digitally then don't try replicating it by hand). Take time over this and aim for some professional looking illustrations. See separate post for an example of this.
    Once you have all these things you need to really focus on making some impressive responses that capture the feel of each Artist. Use the lightbox to start your drawings from your own photos off if it helps. You might want to use software to extend and stretch the figures in your photos and achieve something closer to the classic fashion illustration proportions (which are quite different to the real proportions of the human body).

    Here's an example of what I'm talking about:


    Raw photo file

    Digital Illustration by Jocelyn Gravot

    
    Digitally developed response to Jocelyn Gravot

    SKETCHBOOKS UPDATE TRASHION PROJECT


    Well, one reason behind using photography to record your Moodboards and not sticking everything down is that it means that the material you have gathered is then available for inclusion in your sketchbook.  If you have done slides to  create your Presentation then this fine for your sketchbook. 
    So please make sure you have  divideed (and potentially duplicated) the visual material amongst your design teams, and then compile the following:
    • 2 or more Sketchbook pages of visuals and information on your garment/accessory. Different versions - traditional and radical, history, definition.
    • 2 or more Sketchbook pages of visuals and information on the object you need to recycle. History, typical uses, unusual uses, previous applications in Fashion.
    • 2 Pages showing some examples of collections, ideally exploring some recycling, try looking at Martin Margiela, Gareth Pugh and Jez Eaton. Provide some analysis.
    • One or more good observational drawings from your object.
    • At least 2 pages recording experimentation and manipulation of your object.
    • At least 2 annotated design sketches outlining your initial garment/accessory proposals.
    • Printouts of all the slides from your presentation, plus copies of any cue cards you use.
    We will start to explore approaches to Fashion Illustration, responding to existing Illustration styles, before trying to develop a more personal style with which to illustrate your own design proposals.

    Monday 18 November 2019

    PRESENTATIONS SCHEDULE

    All presentations to be given on Thursday 21ST  November 1.45 PM    
    Good luck! 

    Presentation Delivery Tips:

    Make sure you have produced the most professional slides for each of the 4 themes.  These should be edited  well and made into a slick powerpoint presentation as soon for Thursday.  You should have ample information to work with and surplus imagery to choose from for making your slides.  

    • All group members should contribute to the delivery of the presentation.
    • Plan who will say what. You will need to explain and expand upon the visuals you put up on screen (don’t just read text off the slides). Think what will make your presentation the best.. will you pass things round, pose a question to the audience or inform us of a fact we are unaware of?
    • Make it have good pace but be enthusiastic about your object and couture you have discovered. 
    • Preparing and using cue cards is likely to be helpful. 
    • Presentations need to last approximately 10 minutes. 
    • Speak clearly and loudly, (and not too fast), face your audience. 
    • Practice your delivery as a group in advance. When you practice time your presentation to ensure it is of a suitable length.


    Schedule for Thursday 21st November Trashion Presentations

    Time
             Object
    Students

    2pm

    Disposable Cutlery 


    Iona

    Kaci
    Conner
    Sophie


    2.15pm

    Plastic Bags

    Mathilda

    Luke
    Sophie


    2.30pm


    Loom Bands
    Honey B
    Santek
    Bonita

    2.45pm

    Egg boxes


    Lauren
    Anna
    Rachel
    Doug


    BREAK


    3.10pm


    Rubber Gloves

    Poppy C

    Jasmine
    Honey P
    Gaja


    3.25pm

    Paper Plates
    Laura 
    Annabel
    James


    3.40pm


    Corrugated Cardboard 
    Poppy B
    Eloise
    Izzy
    Ted


    3.45pm
    Plastic cups
    Mackenzie
    MJ
    Lucian
    Amelia

    Monday 11 November 2019

    TRASHION- FIRST TASKS AND PRESENTATIONS

    TRASHION GROUP PRESENTATION 

    THEME ONE (one or two slides)
    Introductory slide/s which shows what the group object is, which garments/fashion items are to be made and who the members of the group are. This should contain your own photography and drawing of the object and photos of the group members.
    SLIDE 1 Example
    You will need to compile something similar in your groups.
    THEME TWO (one or more slides)
    These slide/s should give a flavour of all initial information and findings about the object in question including its history/invention. Images about how it is standardly used and alternative uses (see if it has already been used in fashion). Also research some information about its general recyclability – i.e. plastic bottles are now widely used in the production of fleece material.
    SLIDE 2 Example
    THEME THREE (one or more slides)
    Demonstrate and record ways in which you can manipulate/join/alter your object that might be helpful in garment construction. 
    Explore processes like cutting, burning, laser cutting, heat pressing, appliqué, tearing, crushing, layering, stitching, riveting and photographing the object with a view to making a screen print.
    Use a mixture of photographs of your processes, annotation and actual samples of your manipulated object to create your slides.

    THEME FOUR (one or more slides)
    A consideration of common element(s) which will bring all your garments/accessories together as a collection, this should include some early design idea sketches. You should also include some examples of what a fashion collection is, look for inventive Haute Couture and ideally find Designers who have used recycled materials (e.g. Martin Margiela, Jez Eaton, Gareth Pugh).


    Further Tips 
    Over the first couple of days of the project you need to research both your object and your garment - collect and print enough material for compiling your A1 moodboards. Photos of what you collect for this will form the slides for the first 2 Themes in your PowerPoint.
    KEEP THIS STUFF LOOSE, DON'T STICK IT DOWN:
    • Lots of visual research into the garment you drew from the "Hat", different versions/styles/shapes try to find inventive Haute Couture versions. Find 12 - 20 examples, print these images in a variety of sizes up to A4.
    • Plentiful visual research into the object you drew from the "Hat" - different versions, different uses, unusual applications of your object, if you can find examples of it in Fashion then include these. Again 12 - 20 examples in a range of sizes.
    • Other stuff you need includes: headings and titles (use interesting fonts), dictionary definitions of your object and garment, photos of yourselves, as well as your own good drawings and photographs of your object.
    For sourcing imagery try using  http://www.pinterest.com/ (open a free account if you don't already have one). Thoughtfully selected search terms in Pinterest will lead you to a host of rich imagery and ideas.
    After completing the research slides you need to concentrate on Themes 3 & 4. These are a little more demanding as they focus on experimentation and initial design ideas. 
    • For Theme 3 you will need to be imaginative in how you manipulate your object and record your experiments photographically. Explore processes like cutting, burning, laser cutting, heat pressing, appliqué, tearing, crushing, layering, stitching, riveting and photographing the object with a view to making a screen print.
    • For Theme 4 you will need to consult with all members of your Design team across the two groups to come up with some common themes for your collection (e.g. colours/particular ways of manipulating your object), after consultation you need to come up with some initial design ideas. 
    • For Theme 4 you will also need to find several examples of existing Collections and print 6 -10 images images of these . Most designers/design houses release themed collections seasonally, look for examples of collections that are inventive, exuberant and perhaps use elements of recycling - the work of Martin Margiela and Jez Eaton might be valuable starting points.
    Photographing Mood boards and preparing Images for Presentation

    You have the option of preparing your presentation slides either digitally or through manual layouts that you record photographically and then convert into a digital format. If you are making manual Mood boards here are a few steps you can take to make sure that they look good as presentation slides.
    The first of those are in taking the photographs - make sure they are well lit and that you position your camera above the centre of the image to avoid getting a taper distortion, take several photos to ensure you get images with a good sharp focus.
    An example of "taper distortion"
    Once you have got decent photographs it is usually possible to enhance them in PhotoShop before you transfer them into your presentation. Here is a raw photographic image followed by an edit of the same photo.


    To achieve this I did the following:
    • Rotated the original image.
    • Cropped the image to remove unwanted areas.
    • Adjusted brightness and contrast to give the image more on-screen "zip".
    • Used the "sharpen more" filter to add crispness to the image.
    • Created a new layer, made a rectangular selection and filled this with a pale blue colour, then applied the multiply Layer style to this blue box.
    • Using the text tool added notes (in a font downloaded from www.dafont.com). I then used the move tool to place the text over the blue area.
    • Finally from the Layer Menu I added a drop shadow to my text from the Layer Style options.
    Having done all this I then saved the final image as a jpeg (option available from the dropdown menu when you save in Photoshop). Using jpegs as presentation slides works fine, if you upload .psd PhotoShop documents or high resolution digital photos you may find they slow your presentation down and stop it functioning properly.

    After you have arranged and photographed your mood boards share the loose imagery out between you and collage this into sketchbooks, giving due consideration to layout and combining text and image effectively.

    We will be giving Presentations at the end of next week (Thursday 21ST November AT 1.45 PM)

    GROUPS FOR TRASHION

    CHARMIAN'S GROUP

    LOOM  BANDS

    Honey B Jacket
    Santek - Accessory
    Bonita - Dress

    RUBBER GLOVES

    Poppy C - Jacket
    Jasmine  - Skirt
    Honey P -Trousers
    Gaya - Shirt

    CORRUGATED CARDBOARD

    Poppy B - Dress
    Eloise - Skirt
    Izzy - Jacket
    Ted - Skirt 


    CUTLERY

    Iona- Accessory
    Kaci - Jacket
    Conner - Trousers
    Sophie - Trousers 


    ANNIE'S GROUP 


    PLASTIC BAGS 

    Mathilda - Dress
    Luke - Accessories
    Sophie

    PLASTIC CUPS

    Mackenzie- Trousers 
    MJ
    Lucian- Jacket 
    Amelia

    PAPER PLATES 

    Laura- Trousers 
    Annabel
    James - Dress

    EGG BOXES 

    Lauren - Trousers
    Anna
    Rachel
    Doug - skirt


    TRASHION PROJECT

    PROJECT– TRASHION
    SPECIALISM:  FASHION  & TEXTILES


    TIME: 6 Weeks

    UNIT 6: An integrated approach to 3D problem solving n art and design


    MATERIALS: Mixed Media
    RESOURCES: Sewing Machine, Computer, Camera, drawing media, Photocopier, basic hand tools, 3D workshop and an object……

    ASSIGNMENT OUTLINE:

    With the current threat to humanity of depleted natural resources and global warming due to overuse of resources and mishandling of waste etc, the idea of make do and mend is becoming more relevant if not essential!

    Fifty years ago the earth was populated by half the number of people it is now, and by 2050 this number is expected to increase to 10 billion. Simply, there won’t be enough resources to go round!

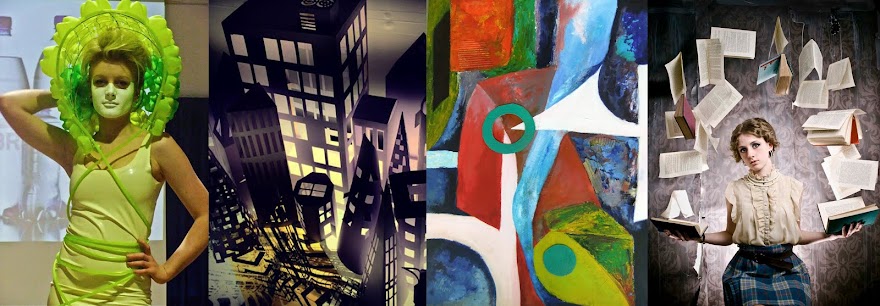
    In the U.K. each year, we throw away an average of two million tonnes of fast fashion clothing that was probably only worn six or seven times a piece. A large percentage of clothing is made from non biodegradable products such as nylon and viscous. Something has to change…. Products on the high street and the catwalk are beginning to acknowledge that this needs to be addressed. Few things touch as many people as fashion; therefore, the continuation of the new consciousness beginning to emerge through the production of sustainable and recycled clothing, rests firmly on your shoulders.

    Using just a single object which may be commonly found in the home (clothes peg/ coke can etc., etc.) and an existing item of clothing, you are being asked to create a hybrid piece which uses the idea of recycled fashion. Furthermore, you will be working alongside other individuals in the UAL groups to develop the idea of a collection. 

    GUIDELINES

    Week 1 & 2

    EXPLORATION OF YOUR OBJECT IN YOUR GROUPS

    It is very important at the beginning of this project to work within your groups delegating jobs and discussing your findings all the time.  You may well be working closely with someone you currently know very little about. And in order to achieve a believable and successful result you will need to communicate effectively and get to know them well to get the best result for your group! 

     Focus on exploring your object: Think about weaving, stretching, melting, burning, adhering, scoring, rolling, wrapping, dissecting, reproducing, representing and smashing as considerations for getting the most out of not only your object, but your imagination too.

    You should gather examples of your material
    • sourcing of the various varieties of your individual objects
    • examples of how these may have already been used in fashion
    • a range of careful studies of these objects, both as photographs and illustrations.
    You should be thinking all the time about how you will combine them together to create something new and exciting. How flamboyant or understated your ideas/designs are is up to you, but keep in mind that you will actually have to create one of them, so be realistic!

    With your allocated garment:
    • Find as many examples of this as possible
    • Think about ways that you can adapt your own.

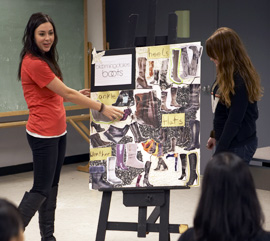
    GROUP MOODBOARDS, POWERPOINT AND THE PRESENTATION

    What you collect/produce is going to be presented as both moodboards and a powerpoint, so at this stage it is advisable not to stick anything into your books…Sketchbooks are not always practical for expressing your ideas to a large group so you will need to work on a grander scale!  You will create a series of moodboards which will explain your ideas and concepts so far.   A mood-board is an important tool in the design industry and is used at the start of projects in order to maintain a constant flow of ideas. Yours will be instrumental in helping you get the most out of this project and you will need to photograph them as they develop, so do make sure that you have a camera.  These images will then be used to create a powerpoint presentation, guidelines will be given on how to do this.  This slideshow will be your first collaborative piece and will require good communication and a well organised plan of action as you work together on the same presentation. You will also be asked to undertake some sustained investigations into what a ‘collection’is   

    Weeks 3 & 4

    FASHION ILLUSTRATION, YOUR OWN DESIGNS

    • You will be asked to select two different fashion illustrators’ work and document these in your sketchbook, providing analysis on both their work and how you think their style of illustration might be appropriate to your own designs.
    • Produce a design idea of your own in each style. You will be asked to produce further design ideas and start to physically gather more of the same object, and get stuck into manipulating them, seeing what works and what doesn’t work in order to apply it successfully to your garment. Remember to collaborate with your group throughout.  You may need to compromise on things so prepare to be open minded. You may also wish to look at www.art-dept.com for further fashion illustration inspiration. 

    Week 5/6

    CONSTRUCTION, PHOTOGRAPHING WORK AND CATWALK

    Following your investigations, you should now be able to come up with the definitive design – it is now time to make it…Photograph every stage as you go so that you can continue to update your power point appropriately.

    Take a series of well styled photos of the final outcome in studio . Even the best design can be completely ruined by a lack of attention to detail in its final documentation…… Use www.art-dept.com to help you in this too – someone like Rankin is really worth looking at, as is showstudio.com & Tim Walker. 

    You will all be showing your work in the studio or on location after Christmas. 

    Write a 500-1000 word evaluation of the project – guidance notes will be given. 

    MINIMUM SUBMISSION REQUIREMENTS:

    • 1 COMPLETED SKETCHBOOK.
    • CONSIDERABLE EXPLORATION OF OBJECT
    • A SERIES OF MOODBOARDS – PHOTOGRAPHS AS EVIDENCE
    • 1 COMPLETED POWERPOINT – EACH GROUP SHOULD HAVE IT
    • GROUP PRESENTATION – EVERYONE TO SPEAK
    • FASHION ILLUSTRATIONS RESEARCH AND RESPONSES
    • SERIES OF OWN FASHION DESIGNS.
    • FINAL GARMENT AND STUDIO AND LOCATION PHOTOGRAPHS
    • WRITTEN EVALUATION


     Look specifically at individuals like Hussein Chalayan the late Alexander McQueen, John Galliano, Gareth Pugh and Commes des Garcons, for the more alternative in ideas! Sustainable fashion heroes are Gary Harvey, Martin Margiela, Junky Styling, Ciel, and From Somewhere, and this one is just interesting if you want to get a bit more into the magazine side of things – good for layout etc….http://magculture.com/blog/ 


    The library also has some amazing books – check out Maison Martin Margiela, Skin and Bones, A century of fashion, Techno textiles volumes 1 & 2, Extreme Beauty: The Body Transformed, Fashion at the edge, Fashion: Concept to catwalk, to name but a few! 


    Use the internet.
    Use the library.
    Use your imaginations 
    Remember the visual imagination is fueled by what you see.

    Link on google classroom to see the powerpoint you were shown


    Wednesday 6 November 2019

    ALPHASEMBLE PROJECT AND EVALUATION


    Your evaluation should be written as a flowing piece of text of between 600- 800 words, word processed and ideally should integrate images of your work (especially your 3D outcomes).  


    • Describe how you started the project, talk about how you selected typefaces and how you went about your initial letter overlay drawings.
    • Identify things in your 2D work that went well, what elements did you carry forwards from your first studies in colour and print work.
    • Which Artists and Designers did you research at this stage of the project? Did you find their work influenced or informed your own studio practice, how?
    • Did you find the move into 3D an easy one to make? What elements from your 2D studies transferred into your 3D relief work?
    • How did you find the practicalities of working in 3D? What techniques did you employ (e.g. cutting, scoring, glue, interlocking)? Describe any problems you encountered and how you dealt with them.
    • Are you happy with your relief work, which elements of it do you regard as particularly successful?
    • Which Sculptors did you look at? Did you find their work interesting, why? Did it inform your own work in any way?
    • What additional challenges did your fully 3D sculptural piece present? Talk about how you addressed sculptural concerns such as points of balance, visual weight and rhythm and creating interest from all angles.
    • Were there any different materials or techniques used that you didn’t use in your relief piece (e.g. constructing volumes, use of wire). Did you find the progression from relief to a fully 3D piece an easy one to make?
    • Are you pleased with your 3D outcome? Identify strengths and weaknesses of this piece.
    • Describe how you went about recording your work through photography and drawing. What steps did you take to ensure you got good images (e.g. lighting, selection of background, focus on details).
    • Overall are you happy with your work and time management in this project? What could you do to be more effective in future?

    Glossary: 

    weight, scale, repetition, linear, shape, volume, texture, 3 dimensional form, organic form, geometric qualities, volumes and planes, defying gravity, physical tension, stability, rhythm, illusion of space, weight, depth, contrasts of colour, light, negative space, balance, connecting points, emphasis, 
    Construction methods - scoring, folding, bending, piercing, boxing, maquettes, prototypes, visual relationship, points of contact, interconnecting areas, dynamic qualities. 


    Try to use the above glossary to help describe and make intelligent statement about your process, experimentation, development and outcome.


    MINIMUM SUBMISSION REQUIREMENTS

    Sketchbook including:
    • 2 linear overlay letterform drawings.
    • One or more tonal/ graphic mark-making letterform drawings.
    • At least 3 colour letterform compositions, these could be coloured ink/bleach. 
    • A series of stencil spray paint images 
    • Found Alphabet using objects or shapes printed off and stuck in wallet size 
    • Research into Jasper Johns’ Letter and Number drawings and paintings. Research should include Background information, your own analysis, good images of Artist’s work and visual response in appropriate media.
    • A gold/silver card plate and several prints from it. 
    • Inverts on the photocopier
    • Minimum 2 images made using Photoshop with George and manipulation of alphabet. 
    • A4 colored card raised letter relief and good photos from this, some A4 of best, some smaller. 
    • Research on David Carson covering his work, show analysis, bio and examples with at least 1 response. 
    • Block letterpress at least 4 strong images
    • Research into Frank Stella’s relief sculptures.
    • Photographs of all your Relief/3D pieces, include detail shots and shoot from a range of angles, consider lighting carefully and shoot against a clean background in studio.  Mixture of A4/A5.
    • At least 3 annotated developmental sketches illustrating your proposals for 3 Dimensional work.
    • Research into an abstract sculptor e.g. Richard Deacon, Naum Gabo, David Smith, Eduardo Chillida.
    • At least one full page sustained pencil drawing in response to photos of your final piece.
    • A word processed project evaluation (see guidance above).

    Any additional work (e.g. further colour experiments with your letter compositions, further research) is obviously welcome and will create a favorable impression! 😊

      PROJECT DEADLINE:  Monday 11th November 4.15 pm in your rooms please with a clearly named sketchbook with professional finish throughout. 


      DESCRIPTORS
      FAIL
      SATISFACTORY PASS
      GOOD
      PASS
      EXCELLENT
      PASS

      1
      Work submitted fails to meet one or more of the assessment criteria and is of a poor standard
      2
      Work submitted meets all of the assessment criteria and is of a satisfactory standard
      3
      Work submitted meets all assessment criteria and is of a high standard
       4
      Work submitted meets all assessment criteria and is of a very high standard
      Context
      Limited understanding of subject context, lacking clarity in aims and purpose. 
      Understanding of subject context used appropriately to make judgments, describe aims and clarify purpose.
      Good understanding and knowledge of subject context used to make sound judgments, articulate ambitions and clarify purpose.
      Comprehensive understanding and knowledge of subject context used to communicate complex concepts, articulate ambitions and clarify purpose.
      Research
      Little or no evidence presented or information does not relate sufficiently to task.

       
      Sufficient relevant information has been gathered, documented and used in the development of ideas.
      Thorough and sustained research and investigation of relevant sources, interpretation and synthesis of information used to inform, support and develop ideas.
      Independently identified, thorough and sustained research and investigation of a range of relevant sources, insightful interpretation and synthesis of information used to inform, support and develop ideas.
      Problem Solving
      Insufficient exploration of alternative ideas and processes. Problems unresolved.
      Sufficient exploration of alternative ideas using established approaches to resolve practical and theoretical problems.
       Decisive demonstration of initiative in effectively solving problems, adapting to unforeseen practical and theoretical challenges to achieve identified goals.
      Decisive demonstration of initiative in effectively solving problems, autonomously implementing creative solutions and adapting to unforeseen practical and theoretical challenges to achieve identified goals.
      Planning & Production
      Ineffective planning and little or no evaluation against aims. Task or tasks are incomplete.
      Evidence of effective planning and evaluation against aims that have contributed to a satisfactory completion of the task or tasks.


      Coherent and reasoned planning, subject engagement and commitment.  Realistic evaluation against aims and efficient production against timescales.
      Detailed and coherent self-directed planning and negotiation, subject engagement and commitment. Continuous evaluation against aims and efficient production against timescales.


      Practical Skills
      Limited range of processes demonstrated, judgement and execution of techniques is poor.
      Adequate range of processes, skills and knowledge demonstrated. Competent execution and application of techniques used to develop ideas.
      Consistent and appropriate processes, skills and knowledge applied to extend enquiry and develop creative solutions.
      In depth understanding and aesthetic awareness, imaginative and flexible processes, skills and knowledge applied in extensive enquiry to develop creative solutions.
      Evaluation & Reflection
      Insufficient evidence of ongoing evaluation, lack of or only basic analysis and little or no justification for ideas.
       Clearly communicated evidence of valid evaluation and realistic analysis independently used to inform and develop ideas.
       Effective communication of analysis and interpretation, independent synthesis of information and application of reasoned decision making to inform development of ideas.
      Accomplished and professional communication of perceptive analysis and interpretation, demonstrating clarity and sophistication in thinking and maturity in decision making to progress ideas.

      Presentation
      Ineffective communication and presentation of ideas. Lack of clarity in structure, selection and organisation.
      Competent communication and sufficient clarity and consistency in presentation of ideas appropriate to the intended audience.
      Confident selection, organisation and communication of ideas. Consistent approach to presentation demonstrating a good understanding of conventions and standards.
      Confident selection, organisation and communication of ideas. Demonstrating autonomy, personal style and an ambitious use of available resources to communicate ideas effectively to an intended audience.